
初めてのオビーゲームを作ろう!AIで実践Roblox開発【実践編】
前回の操作編では、Claude Codeの基本操作と効果的な指示の出し方を解説しました。今回は、いよいよ実際のオビーゲームを最初から最後まで作ります。
目次
いよいよ実践です!この章では、オビー(障害物コース)ゲームを最初から最後まで作ります。
オビーとは?
- 障害物(Obstacle)コースを飛び越えてゴールを目指すゲーム
- Robloxで最も人気のあるジャンルの一つ
- シンプルだけど奥が深い
この章の目標:
- スタート地点からゴールまでのコースを作る
- チェックポイントシステムを実装
- ゴール到達時の演出を追加
- 完全に動作するゲームを完成させる
所要時間:2〜3時間
プロジェクトの準備
新しいプロジェクトを作成
Cursorのターミナルで:
cd C:\\Users\\[あなたのユーザー名]\\Desktop\\Claude
mkdir MyObbyGame
cd MyObbyGame
Cursorでフォルダを開く
- Cursor → File → Open Folder
MyObbyGameフォルダを選択
CLAUDE.mdを配置
- 新しいファイルを作成:
CLAUDE.md - 第5章の「CLAUDE.md 簡易版」の内容をコピー&ペースト
- Ctrl + S で保存
Roblox Studioで新規プロジェクト
- Roblox Studio → New → Baseplate
- すぐに保存:File → Save to Roblox
- タイトル:
My Obby Game
- Game Settings → Security → Allow HTTP Requests をオン
- Plugins → MCP をオン
開発環境を起動
ターミナル1(MCPサーバー):
cd C:\\Users\\[ユーザー名]\\Desktop\\Claude\\studio-rust-mcp-server
cargo run
ターミナル2(Claude Code):
cd C:\\Users\\[ユーザー名]\\Desktop\\Claude\\MyObbyGame
claude –mcp-config C:\\Users\\[ユーザー名]\.cursor\\mcp.json
モデル選択:/model → 2(Opus 4.6)
準備完了!
ステップ1: プロジェクト初期化
Claude Codeに以下のプロンプトを入力:
Initialize this Roblox obby game project following these steps:
1. Read and apply CLAUDE.md rules for all operations
2. Create the project structure:
– src/ServerScriptService/GameLogic/
– src/ServerScriptService/Checkpoints/
– src/ReplicatedStorage/Modules/
– Create .gitkeep files in empty directories
3. Create a README.md describing this as an obby game project
4. Confirm you’re ready to build an obby game with:
– Checkpoint system
– Respawn functionality
– Goal celebration
Please confirm the setup is complete.
Claude Codeがプロジェクト構造を作成し、準備完了を報告します。
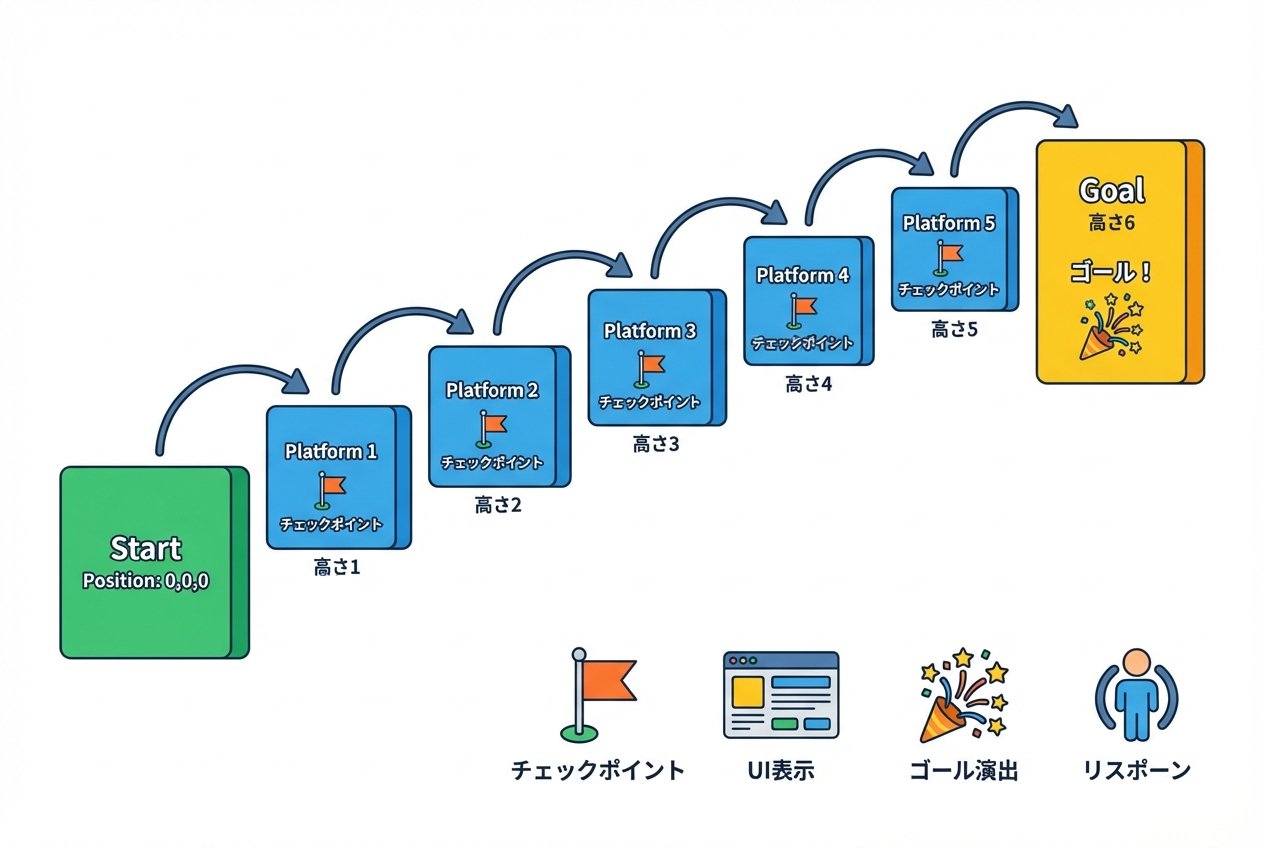
ステップ2: コースを作る
基本的なプラットフォームを配置
まず、Roblox Studioで手動でコースの骨組みを作ります。
スタート地点を作る:
- Roblox Studio → Home タブ → Part ボタンをクリック
- Workspaceに灰色のブロックが出現
- Properties パネルで以下を設定:
- Name:
StartPlatform - Size:
20, 1, 20(大きなスタート地点) - Position:
0, 0.5, 0 - Anchored: ☑(チェックを入れる)
- BrickColor:
Bright green
プラットフォーム1を作る:
- 再度Partボタンをクリック
- Properties:
- Name:
Platform1 - Size:
8, 1, 8 - Position:
0, 1, 15(スタートの前方) - Anchored: ☑
- BrickColor:
Medium blue
プラットフォーム2〜5を作る:
同様に、以下の位置にプラットフォームを配置:
| 名前 | Position |
|---|---|
| Platform2 | `5, 2, 25` |
| Platform3 | `10, 3, 35` |
| Platform4 | `5, 4, 45` |
| Platform5 | `0, 5, 55` |
ゴール地点を作る:
- Partボタンをクリック
- Properties:
- Name:
GoalPlatform - Size:
15, 1, 15 - Position:
0, 6, 70 - Anchored: ☑
- BrickColor:
Bright yellow
カメラで確認:
Roblox Studio上部のカメラツールで視点を動かして、コース全体が見えるか確認しましょう。
ステップ3: スポーンポイントを設定
プレイヤーがゲーム開始時にスタート地点に現れるようにします。
SpawnLocationを配置
- Home タブ → Model タブに切り替え
- Gameplay セクション → Spawn ボタンをクリック
- スポーンロケーションが出現
- スタート地点の上(
StartPlatformの上)に移動
- Position:
0, 2, 0(StartPlatformの1.5ユニット上)
確認:
Playボタンを押してテストプレイ。スタート地点からスタートすればOK。
プラットフォームからプラットフォームへジャンプできるか試してみましょう!
(落ちたら自動的にスポーンポイントに戻ります)
ステップ4: チェックポイントシステムを作る
プレイヤーが途中のプラットフォームに到達したら、そこから再スタートできるようにします。
Claude Codeにスクリプト生成を依頼
Create a checkpoint system for the obby game with the following features:
1. When a player touches a platform (except StartPlatform and GoalPlatform), it becomes their new spawn point
2. Visual feedback: The platform should briefly flash bright green when activated
3. Each player should have their own checkpoint (not shared between players)
4. Save the main script to ServerScriptService/Checkpoints/ as CheckpointManager.lua
5. Create a ModuleScript in ReplicatedStorage/Modules/ called CheckpointModule.lua for shared checkpoint logic
Follow CLAUDE.md rules for all file operations.
Claude Codeが生成するもの:
- CheckpointManager.lua:メインのチェックポイント管理スクリプト
- CheckpointModule.lua:共有ロジックのモジュール
チェックポイントを有効にする
Roblox Studioで、各プラットフォーム(Platform1〜5)に以下の設定を追加:
- Platform1を選択
- Properties → Add Attribute をクリック
- 属性名:
Checkpoint、型:Boolean、値:true
Platform2〜5にも同じ属性を追加します。
StartPlatformとGoalPlatformには追加しません。
テスト
Playボタンでテストプレイ:
- Platform1に飛び乗る → 一瞬緑色に光る
- わざと落ちる → Platform1から再スタート ✅
- Platform2に進む → またチェックポイントが更新される ✅
ステップ5: ゴール到達の演出
ゴールに到達したときの演出を追加しましょう。
Claude Codeに依頼
Create a goal system for the obby game:
1. When a player touches the GoalPlatform, trigger a celebration:
– Print “[PlayerName] reached the goal!” to Output
– Display a congratulations message on their screen for 5 seconds
– Play a victory sound (use built-in Roblox sound ID: rbxassetid://1280841437)
– Spawn confetti particles above the player
2. After celebrating, teleport the player back to the start
3. Save the script to ServerScriptService/GameLogic/ as GoalManager.lua
Follow CLAUDE.md rules.
Claude Codeが生成:
- GoalManager.lua:ゴール到達時の処理
テスト
Playボタンでテストプレイ:
- すべてのプラットフォームを飛び越えてゴールへ
- ゴールに着地すると:
- 画面に「Congratulations!」メッセージ ✅
- サウンドが鳴る ✅
- 紙吹雪エフェクト ✅
- 5秒後にスタートに戻る ✅
ステップ6: UIを追加する
プレイヤーに現在のチェックポイント番号を表示しましょう。
Claude Codeに依頼
Create a simple UI for the obby game:
1. Display the current checkpoint number at the top-center of the screen
2. Format: “Checkpoint: 1/5”
3. Update the number when the player reaches a new checkpoint
4. Use TextLabel in a ScreenGui
5. Save as a LocalScript in StarterPlayer/StarterPlayerScripts/ called CheckpointUI.lua
Follow CLAUDE.md rules.
カスタマイズ(Cursorで微調整)
Claude Codeが生成したUIのスタイルをCursorで調整できます。
CursorでCheckpointUI.luaを開いて、以下の部分を探します:
label.TextSize = 24
label.TextColor3 = Color3.fromRGB(255, 255, 255)
これを好みに変更:
label.TextSize = 32 — もっと大きく
label.TextColor3 = Color3.fromRGB(255, 215, 0) — ゴールド色
label.Font = Enum.Font.FredokaOne — フォント変更
Ctrl + S で保存 → Roblox Studioに貼り付け → テストプレイ
好みのスタイルになるまで調整しましょう!
ステップ7: 難易度調整
ジャンプ距離を調整
プラットフォーム間の距離が難しすぎる/簡単すぎる場合、Roblox Studioで手動調整:
- Platform2を選択
- PropertiesのPositionを変更
- テストプレイして確認
- ちょうどいい難易度になるまで繰り返し
難易度の目安:
- 簡単:ジャンプで余裕で届く(距離 8〜10ユニット)
- 普通:しっかり狙わないと届かない(距離 12〜14ユニット)
- 難しい:端から端へのジャンプが必要(距離 15〜18ユニット)
プラットフォームのサイズを調整
小さいプラットフォームほど難易度が上がります:
- 簡単:8x1x8 以上
- 普通:6x1x6 〜 5x1x5
- 難しい:4x1x4 以下
後半のプラットフォームを小さくして、難易度を上げましょう:
- Platform4:
Size = 5, 1, 5 - Platform5:
Size = 4, 1, 4
ステップ8: 追加機能(オプション)
時間に余裕があれば、以下の機能を追加してみましょう。
機能1: タイマー
ゴールまでのタイムを計測します。
プロンプト例:
Add a timer system that:
1. Starts counting when the player touches Platform1
2. Displays elapsed time in the format “Time: 00:45”
3. Stops when reaching the goal
4. Shows final time in the congratulations message
Save to ServerScriptService/GameLogic/ as TimerManager.lua
Follow CLAUDE.md rules.
機能2: 動く障害物
移動する障害物で難易度を上げます。
プロンプト例:
Create a moving obstacle for the obby:
1. A red spinning part between Platform2 and Platform3
2. Rotates continuously
3. Knocks the player off if touched (does not kill, just pushes)
4. Save to ServerScriptService/GameLogic/ as MovingObstacle.lua
Follow CLAUDE.md rules.
機能3: コイン収集
コースにコインを配置して、収集システムを追加。
プロンプト例:
Add a coin collection system:
1. Place 10 yellow spherical coins along the course
2. When collected, the coin disappears and plays a sound
3. Display collected coins: “Coins: 5/10” in the UI
4. Save to ServerScriptService/GameLogic/ as CoinManager.lua
Follow CLAUDE.md rules.
ステップ9: 最終調整とテスト
テストプレイチェックリスト
以下をすべて確認しましょう:
- ☐ スタート地点から始まる
- ☐ すべてのプラットフォームにジャンプで到達できる
- ☐ チェックポイントが正しく機能する(各プラットフォームで光る)
- ☐ 落ちたら最後のチェックポイントから再開
- ☐ ゴールに着くと演出が再生される
- ☐ UIが正しく表示される
- ☐ エラーがOutputに表示されない
デバッグ
もし問題があれば、Claude Codeに相談:
I’m experiencing this issue: [問題の説明]
The error message is: [エラーメッセージ]
Please help me fix it.
友達に遊んでもらう
- Roblox Studio → File → Publish to Roblox
- タイトルと説明を入力
- 「Public」または「Friends」を選択
- Publishをクリック
友達を招待してフィードバックをもらいましょう!
ステップ10: さらなる改善
Claude Codeにレビューを依頼
Review all the scripts in this obby game project and suggest improvements for:
1. Performance optimization
2. Code readability
3. Best practices for Roblox development
4. Potential bugs or edge cases
Provide a prioritized list of improvements.
Claude Codeが改善提案をリストアップしてくれます。
Cursorで見た目を整える
- カラーテーマを統一(すべてのプラットフォームの色を調整)
- ライティングを追加(Lighting サービスで雰囲気を変える)
- スカイボックスを変更(もっとカッコいい背景に)
Roblox Studio の Lighting 設定:
- Explorer → Lighting を選択
- Properties で以下を調整:
- Ambient: 少し明るくする
- Brightness: 2〜3
- OutdoorAmbient: 空の色を変える
完成!
おめでとうございます!🎉
あなたは今、完全に動作するオビーゲームを作り上げました。
このゲームには以下が含まれています:
- ✅ 複数のプラットフォームコース ✅ チェックポイントシステム ✅ リスポーン機能 ✅ ゴール到達時の演出 ✅ プレイヤー用UI ✅ (オプション)追加機能
そして、あなたはプログラミングをほとんど学ばずにこれを実現しました。
このゲームから学べること
開発プロセス
- 企画:何を作るか明確にする
- 構造:基本的なレベルデザイン(プラットフォーム配置)
- 機能実装:チェックポイント、ゴール、UI
- 調整:難易度、見た目、タイミング
- テスト:バグ修正とフィードバック
このプロセスは、どんなゲーム開発にも共通です。
Claude Codeとの協力
- Claude Code:システムの実装(スクリプト生成)
- あなた:デザイン、調整、最終決定
AIはツール。クリエイティブな判断はあなたの仕事です。
Cursorの活用
- 細かい数値調整(ジャンプ力、タイマー、色など)
- コードの比較と確認
- プロジェクト全体の把握
デュアルセーブのおかげで、効率的に開発できました。
次のステップ
このオビーゲームをベースに、以下を試してみましょう:
レベルを追加
- Stage 2, Stage 3… と続きを作る
- 各ステージで難易度を上げる
- ステージ選択メニューを追加
新しいギミック
- 消える床(一定時間で透明になる)
- ジャンプパッド(高く飛べる)
- 回転する橋
- 溶岩エリア(触れるとリスポーン)
ソーシャル機能
- リーダーボード(最速タイム)
- フレンドと協力プレイ
- チャット機能
プロンプトの例:
Add a disappearing platform mechanic:
1. Platform becomes transparent after 2 seconds of being touched
2. Reappears after 5 seconds
3. Add this to Platform3
Save to ServerScriptService/GameLogic/ as DisappearingPlatform.lua
トラブルシューティング
よくある問題
問題1: チェックポイントが機能しない
確認:
- 各プラットフォームに
Checkpoint属性が追加されているか - CheckpointManager.lua がServerScriptServiceにあるか
問題2: ゴール演出が再生されない
確認:
- GoalPlatformの名前が正しいか
- GoalManager.lua がServerScriptServiceにあるか
- HTTPリクエストが有効か(サウンド再生に必要)
問題3: UIが表示されない
確認:
- CheckpointUI.lua がStarterPlayerScriptsにあるか
- LocalScript タイプになっているか
解決しない場合:
I’m having trouble with [機能名]. Here’s what I’ve checked:
– [確認した内容]
The expected behavior is: [期待される動作]
The actual behavior is: [実際の動作]
Please help me debug this.
まとめ
この章で達成したこと:
- ✅ ゼロから完全なオビーゲームを作成 ✅ Claude Codeで複雑なシステムを実装 ✅ Roblox Studioで視覚的なデザイン ✅ Cursorで細かい調整 ✅ デバッグとテストプレイ
次回のまとめ編では、さらに学ぶためのリソースと、収益化への道筋を紹介します。
あなたはもう、Roblox開発者です。