
CLAUDE.mdで開発効率アップ!プロジェクト管理の基本【管理編】
前回の導入編では、MCPサーバーをセットアップしてClaude CodeとRoblox Studioを接続しました。今回は、AIと効率的に協力するための「プロジェクト管理ルール」を設定します。
目次
この章では、AIと効率的に協力するための「プロジェクト管理ルール」を設定します。
なぜルールが必要なのか?
AIは賢いですが、あなたのプロジェクトの「お約束」を最初は知りません。毎回「これはRoblox Studioに保存して、Cursorにも保存して」と説明するのは面倒ですよね。
解決策:CLAUDE.md
プロジェクトのルートフォルダにCLAUDE.mdというファイルを置くと、Claude Codeは自動的にそれを読み取り、ルールを理解してくれます。
CLAUDE.mdとは?

CLAUDE.md = プロジェクトのルールブック
このファイルに、以下のようなことを書いておきます:
- プロジェクトの構造(どこに何を保存するか)
- 命名規則(ファイル名やスクリプト名のルール)
- コーディングスタイル
- コマンドテンプレート(よく使う指示の定型文)
Claude Codeは、会話の最初にこのファイルを自動で読み取り、すべての指示にこのルールを適用してくれます。
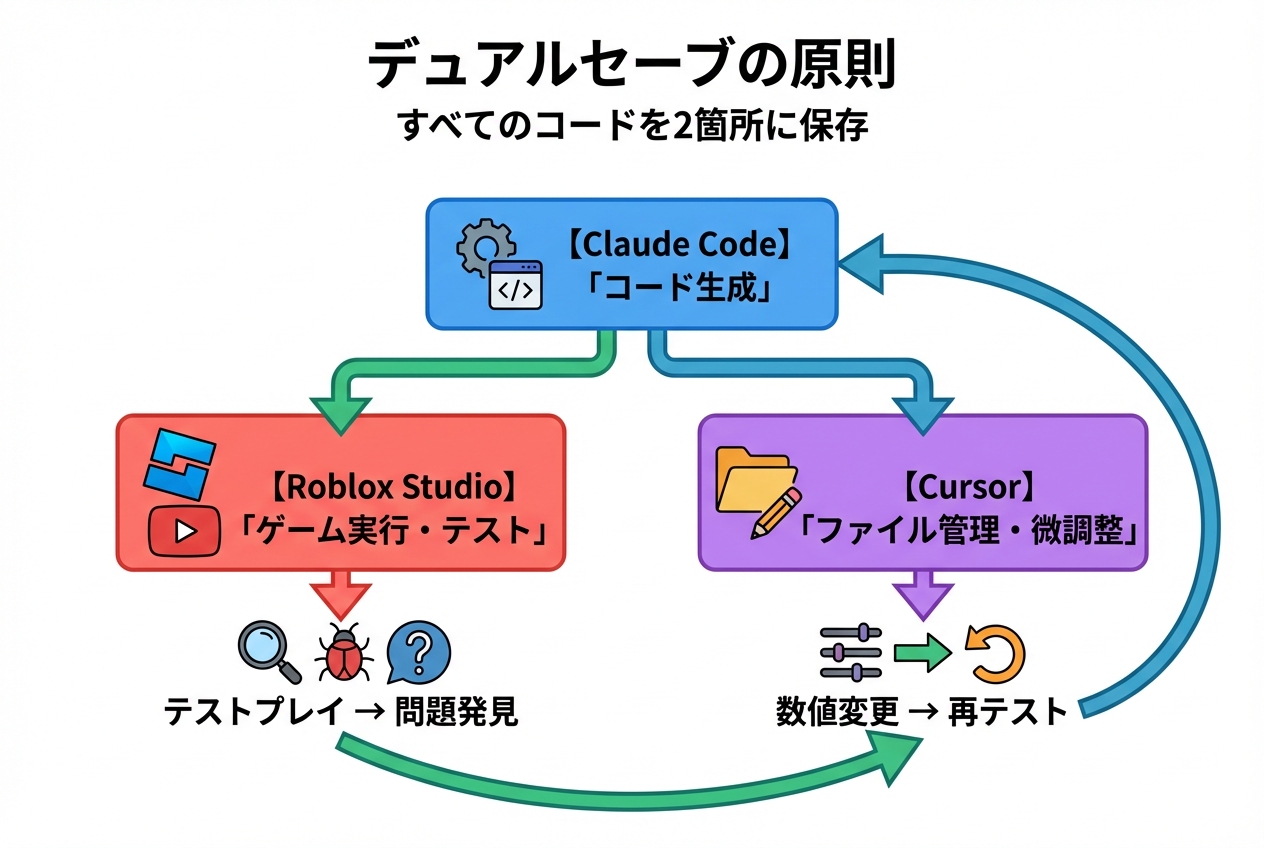
デュアルセーブの原則
この記事で紹介する最も重要なルールは「デュアルセーブ」です。
デュアルセーブとは?
すべてのコードを2箇所に保存すること:
- Roblox Studio:ゲームを実行・テストするため
- Cursor(ローカルファイル):細かい調整や管理をしやすくするため
なぜ2箇所に保存するの?
Roblox Studioだけではダメなの?
Roblox Studioだけでも開発はできますが、以下の問題があります:
- ファイル管理がしにくい
- 複数スクリプトの一括検索・置換ができない
- バージョン管理(Git)が使えない
Cursorも使うメリット:
- ファイルツリーで全体像が見やすい
- 強力な検索・置換機能
- 複数ファイルを同時に編集しやすい
- 細かい数値調整が簡単
ワークフロー
1. Claude Codeに指示
↓
2. AIがコードを生成
↓
3. Roblox Studio に保存(ゲーム実行用)
↓
4. Cursor に保存(ファイル管理用)
↓
5. Roblox Studio でテストプレイ
↓
6. 調整が必要なら Cursor で微調整
↓
7. 再度テストプレイ
CLAUDE.md 簡易版
以下は、この記事で使用するCLAUDE.md 簡易版です。
あなたのプロジェクトに合わせてカスタマイズできますが、まずはこの基本版から始めましょう。
CLAUDE.md の内容
以下をそのままコピーして使えます:
# CLAUDE.md – Roblox Project Development Rules
## Project Structure
project-root/ ├── src/ │ ├── ServerScriptService/ │ │ └── GameLogic/ │ ├── StarterPlayer/ │ │ └── StarterPlayerScripts/ │ └── ReplicatedStorage/ │ └── Modules/ ├── .gitignore ├── README.md └── CLAUDE.md (this file)
## Core Rules
1. Dual Save Principle
– All scripts MUST be saved to both locations:
– Local filesystem: \./src/[corresponding-path]/[filename].lua\
– Roblox Studio: Within the corresponding service
2. Naming Conventions
– PascalCase: Modules, files (e.g., PlayerController.lua)
– camelCase: Functions, variables
– UPPER_SNAKE_CASE: Constants
3. Script Types
– \.lua\ files in ServerScriptService → Script (server-side)
– \.lua\ files in StarterPlayerScripts → LocalScript (client-side)
– \.lua\ files in Modules → ModuleScript (shared code)
## Script Placement Guide
### ServerScriptService/
Server-side main logic
– \GameLogic/\ – Game core features
### StarterPlayer/StarterPlayerScripts/
Client-side scripts
– Run when player joins the game
### ReplicatedStorage/Modules/
Shared modules
– Code used by both server and client
## Command Templates
### Creating Server Script
Create a [feature-name] script:
- Save to ./src/ServerScriptService/GameLogic/[FileName].lua
- Execute in Roblox Studio’s ServerScriptService.GameLogic
- Make it a Script type
### Creating Client Script
Create a [feature-name] LocalScript:
- Save to ./src/StarterPlayer/StarterPlayerScripts/[FileName].lua
- Place in Roblox Studio’s StarterPlayer.StarterPlayerScripts
- Make it a LocalScript type
### Creating Module
Create a [module-name] module:
- Save to ./src/ReplicatedStorage/Modules/[FileName].lua
- Place in Roblox Studio’s ReplicatedStorage.Modules
- Make it a ModuleScript that returns a table
## Quick Reference
### Script Types
– Script: Server-side execution
– LocalScript: Client-side execution
– ModuleScript: Shared code library (requires return statement)
### Common Paths
– Server logic: \ServerScriptService/GameLogic/\
– Client logic: \StarterPlayer/StarterPlayerScripts/\
– Shared modules: \ReplicatedStorage/Modules/\
この内容をコピーして、後で使います。
プロジェクトの初期化
実際にプロジェクトを作成して、CLAUDE.mdを配置してみましょう。
ステップ1: プロジェクトフォルダを作成
Cursorのターミナルで:
cd C:\\Users\\[あなたのユーザー名]\\Desktop\\Claude
mkdir MyFirstGame
cd MyFirstGame
確認:
pwd
以下のように表示されればOK:
C:\\Users\\[ユーザー名]\\Desktop\\Claude\\MyFirstGame
ステップ2: Cursorでフォルダを開く
- Cursor上部メニュー → 「File」 → 「Open Folder」
C:\Users[ユーザー名]\Desktop\Claude\MyFirstGameを選択- 「フォルダーを選択」をクリック
Cursorの左側に、プロジェクトフォルダが表示されます(現在は空)。
ステップ3: CLAUDE.mdを作成
Cursorの左側のファイルツリーで:
- プロジェクトフォルダ名(MyFirstGame)の上で右クリック
- 「New File」を選択
- ファイル名を
CLAUDE.mdと入力してEnter
空のファイルが開きます。
ステップ4: CLAUDE.mdの内容を貼り付け
先ほどの「CLAUDE.md 簡易版」の内容を、すべてコピーして貼り付けます。
Ctrl + Aで全選択- 上記の内容をコピー
Ctrl + Vで貼り付け
ステップ5: 保存
Ctrl + S で保存します。
確認:
左側のファイルツリーに CLAUDE.md が表示されていればOK。
プロジェクトの初期化(Claude Codeを使う)
ここからが本番です。Claude CodeにCLAUDE.mdを読ませて、プロジェクト構造を自動生成してもらいます。
ステップ1: Roblox Studioを準備
- Roblox Studioを起動
- 「New」 → 「Baseplate」を選択
- すぐに保存:File → Save to Roblox
- タイトル:
My First Game - Description: 任意
- 「Save」をクリック
- Game Settings → Security → Allow HTTP Requests をオン
- Plugins タブ → MCP をオン(緑色)
ステップ2: MCPサーバーを起動
Cursorで新しいターミナルを開く:
cd C:\\Users\\[あなたのユーザー名]\\Desktop\\Claude\\studio-rust-mcp-server
cargo run
サーバーが起動したら、このターミナルはそのまま開いておく。
ステップ3: Claude Codeを起動
別の新しいターミナルを開く:
cd C:\\Users\\[あなたのユーザー名]\\Desktop\\Claude\\MyFirstGame
claude –mcp-config C:\\Users\\[あなたのユーザー名]\.cursor\\mcp.json
重要:MyFirstGameフォルダから起動すること!
Claude Codeが起動したら、モデルを選択:
/model
→ 2(Opus 4.6)を選択
ステップ4: プロジェクト初期化プロンプト
以下のプロンプトをClaude Codeに入力します:
Initialize this Roblox project following these steps:
1. Read and apply CLAUDE.md rules for all operations
2. Create the project structure:
– Create directories: src/ServerScriptService/GameLogic/, src/StarterPlayer/StarterPlayerScripts/, src/ReplicatedStorage/Modules/
– Create .gitkeep files in each directory to preserve empty directories
3. Create a README.md with project name and basic description
4. Confirm that you will follow CLAUDE.md rules for all future operations:
– Save to both local filesystem (./src/) and Roblox Studio
– Follow naming conventions (PascalCase for files, camelCase for functions)
– Specify correct script type (Script/LocalScript/ModuleScript)
Please confirm the setup is complete.
何が起こるか:
Claude Codeが:
- CLAUDE.mdを読み取る
- フォルダ構造を作成
- README.mdを生成
- ルールを理解したことを確認
結果の例:
I’ve initialized the project following CLAUDE.md rules:
✓ Created directory structure:
– src/ServerScriptService/GameLogic/
– src/StarterPlayer/StarterPlayerScripts/
– src/ReplicatedStorage/Modules/
✓ Created README.md with project details
✓ Added .gitkeep files to preserve empty directories
I’m ready to develop following these rules:
– Dual Save: All scripts saved to both local files and Roblox Studio
– Naming: PascalCase for modules, camelCase for functions
– Script types: Correct types based on location
The project is ready. What would you like to build first?
ステップ5: 確認
Cursorの左側のファイルツリーを見ると、以下のような構造ができています:
MyFirstGame/
├── src/
│ ├── ServerScriptService/
│ │ └── GameLogic/
│ │ └── .gitkeep
│ ├── StarterPlayer/
│ │ └── StarterPlayerScripts/
│ │ └── .gitkeep
│ └── ReplicatedStorage/
│ └── Modules/
│ └── .gitkeep
├── CLAUDE.md
└── README.md
完璧! プロジェクトの準備が整いました。
CLAUDE.mdの効果を実感する
実際にスクリプトを作成して、デュアルセーブが動作するか確認しましょう。
テストスクリプトを作成
Claude Codeに以下を入力:
Create a simple test script that prints “Hello from MyFirstGame!” to the output. Save it to ServerScriptService/GameLogic/ following CLAUDE.md rules.
Claude Codeがやってくれること:
- テストスクリプトを生成
./src/ServerScriptService/GameLogic/TestScript.luaに保存(Cursor側)- Roblox Studioの
ServerScriptService.GameLogicにも保存(Studio側) - 正しく Script タイプで作成
確認方法
Cursorで確認:
左側のファイルツリー:
src/
└── ServerScriptService/
└── GameLogic/
└── TestScript.lua ← ファイルが作成されている
TestScript.luaをクリックすると、コードが表示されます。
Roblox Studioで確認:
- Roblox Studioに切り替え
- 左側のExplorerパネル
- ServerScriptService → GameLogic → TestScript ← スクリプトがある
- ダブルクリックすると、コードが表示されます
両方に同じコードが保存されています! これがデュアルセーブです。
テスト実行
Roblox Studioで:
- 上部メニュー → 「Test」タブ
- 「Play」ボタンをクリック(再生アイコン)
- Outputウィンドウを確認
Hello from MyFirstGame!
と表示されれば成功!
Stopボタン(停止アイコン)でテスト終了。
Cursorでの微調整
デュアルセーブの最大のメリットは、Cursorで簡単に調整できることです。
例:メッセージを変更する
- CursorでTestScript.luaを開く
"Hello from MyFirstGame!"を"Game initialized successfully!"に変更Ctrl + Sで保存
Roblox Studioに反映
方法1:Claude Codeに同期を依頼
Sync the updated TestScript.lua from local file to Roblox Studio
Claude Codeが自動で同期してくれます。
方法2:手動でコピペ(簡単)
- Cursorでコードをコピー(Ctrl + A → Ctrl + C)
- Roblox Studioで同じスクリプトを開く
- 貼り付け(Ctrl + V)
- Ctrl + S で保存
再テスト
Roblox Studioで再度Playボタン:
Game initialized successfully!
と表示されれば成功!
このように、Cursorで数値や文字列を変更して、すぐにテストできます。
プロジェクトルールのカスタマイズ
CLAUDE.mdは自由にカスタマイズできます。
追加できるルールの例
コーディングスタイル:
## Coding Style
– Use tabs (not spaces) for indentation
– Maximum line length: 80 characters
– Always add comments for complex logic
命名規則の詳細化:
## Detailed Naming Rules
– Event names: Use “On” prefix (e.g., OnPlayerJoined)
– Boolean variables: Use “is”, “has”, “can” prefix (e.g., isAlive, hasKey)
– Private functions: Use underscore prefix (e.g., _initialize)
よく使うテンプレート:
## Common Templates
### Player Join Handler
When creating a player join event:
1. Name it OnPlayerJoined.lua
2. Place in ServerScriptService/GameLogic/
3. Use Players.PlayerAdded:Connect()
必要に応じて、後から追加していきましょう。
まとめ
この章で学んだこと:
- ✅ CLAUDE.md:プロジェクトのルールブック ✅ デュアルセーブ:Roblox StudioとCursorの両方に保存 ✅ プロジェクト初期化の自動化 ✅ Cursorでの微調整とRoblox Studioへの反映
次回の操作編では、Claude Codeの基本操作を詳しく学びます。
これで、効率的な開発環境が整いました。あとは実際にゲームを作るだけです!