
Claude Codeの使い方マスター!基本操作と効果的な指示の出し方【操作編】
前回の管理編では、CLAUDE.mdを使ったプロジェクト管理の方法を解説しました。今回は、Claude Codeの基本操作と効果的な指示の出し方を学びます。
目次
この章では、Claude Codeの基本的な使い方を学びます。
目標:Claude Codeと「会話」しながら、簡単なスクリプトを作れるようになる
Claude Codeの起動(復習)
まず、開発環境を起動しましょう。
準備
1. Roblox Studioを起動
- 前章で作った「My First Game」を開く
- MCPプラグインをオン(緑色)
- HTTPリクエストが有効か確認
2. MCPサーバーを起動(ターミナル1)
Cursorで新しいターミナルを開いて:
cd C:\\Users\\[あなたのユーザー名]\\Desktop\\Claude\\studio-rust-mcp-server
cargo run
このターミナルは開いたまま。
3. Claude Codeを起動(ターミナル2)
別の新しいターミナルを開いて:
cd C:\\Users\\[あなたのユーザー名]\\Desktop\\Claude\\MyFirstGame
claude –mcp-config C:\\Users\\[あなたのユーザー名]\.cursor\\mcp.json
モデル選択:
/model
→ 2(Opus 4.6)を選択
起動完了!
Welcome to Claude Code!
Connected to MCP servers: roblox-studio
Model: Claude Opus 4.6
\>
基本コマンド
Claude Codeには便利なコマンドがあります。/で始まるコマンドを覚えましょう。
主要コマンド一覧
| コマンド | 説明 | 使用例 |
|---|---|---|
| `/clear` | 会話をクリアして新しく始める | 話題を変えるとき |
| `/undo` | 最後の変更を取り消す | 間違ったコード生成を元に戻す |
| `/context` | 現在のコンテキストを確認 | どのファイルを見ているか確認 |
| `/model` | AIモデルを変更 | Sonnet ⇔ Opus 切替 |
| `/permissions` | 権限設定を確認・変更 | ファイル編集の許可設定 |
| `/exit` または `Esc x2` | Claude Codeを終了 | 作業終了時 |
コマンドを試してみる
コンテキストを確認:
/context
現在どのファイルやフォルダをClaude Codeが見ているか表示されます:
Current context:
– Project: MyFirstGame/
– Files in scope: CLAUDE.md, README.md, src/
– MCP connections: roblox-studio (active)
会話をクリア:
/clear
以下のように表示されます:
Conversation cleared. Starting fresh!
過去の会話がリセットされ、新しい話題で始められます。
効果的なプロンプトの書き方
Claude Codeに指示を出すとき、明確で具体的な指示を出すことが重要です。
悪い例 vs 良い例
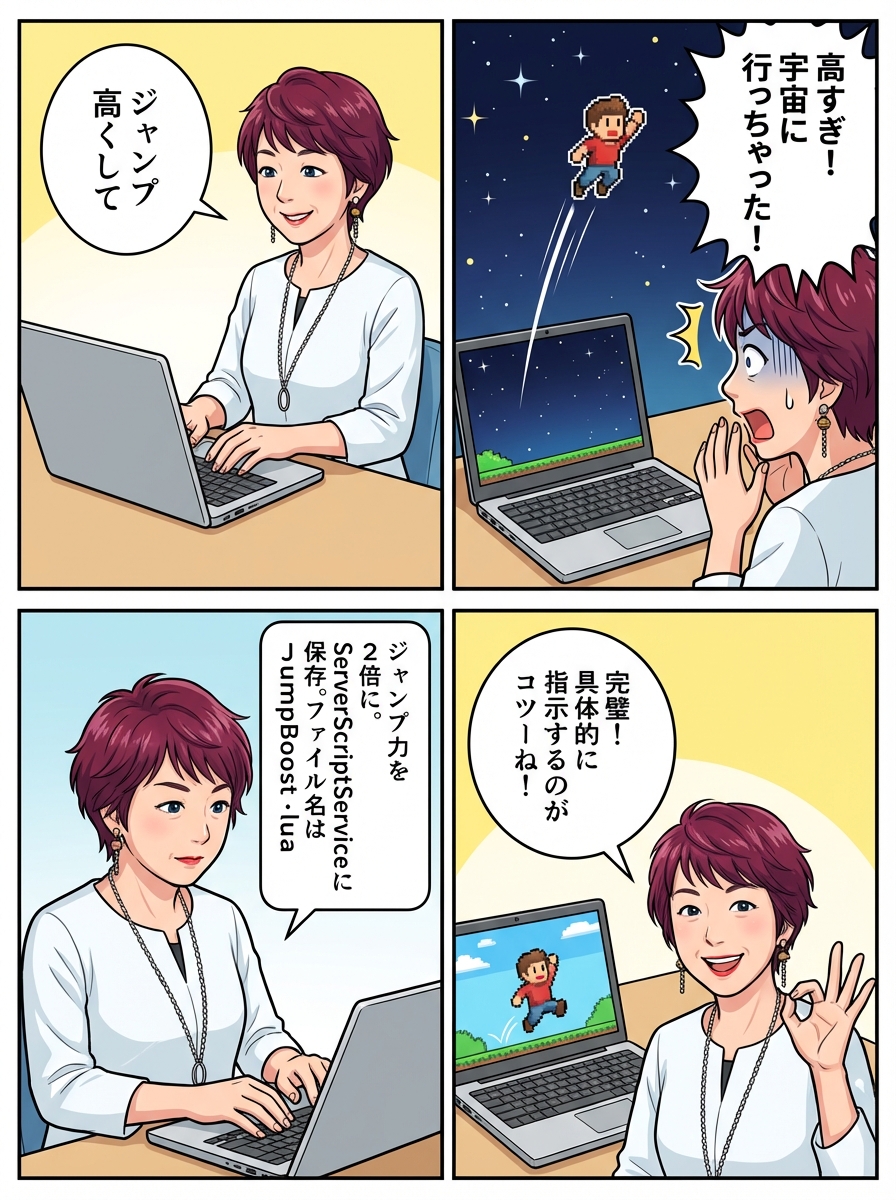
例1: ジャンプ力を変更
❌ 悪い例:
ジャンプを高くして
問題点:
- どのくらい高くするか不明
- どこに保存するか不明
- スクリプト名が不明
- ✅ 良い例:
Create a script that doubles the player’s jump power when they join the game. Save it to ServerScriptService/GameLogic/ as JumpBoost.lua following CLAUDE.md rules.
良い点:
- 具体的な数値(2倍)
- 保存場所が明確
- ファイル名を指定
- CLAUDE.mdルールに従うよう指示
例2: アイテムを作る
❌ 悪い例:
コインを作って
- ✅ 良い例:
Create a collectible coin that:
1. Spawns at position (0, 5, 0)
2. Rotates slowly
3. Disappears when a player touches it
4. Adds 10 points to the player’s score
Save the script to ServerScriptService/GameLogic/ as Coin.lua
プロンプトの基本構造
良いプロンプトには以下の要素を含めましょう:
- 何を作るか(明確な目的)
- どう動くか(具体的な動作)
- どこに保存するか(保存場所とファイル名)
- ルールへの言及(”following CLAUDE.md rules”)
実践:簡単なスクリプトを作る
実際にいくつかスクリプトを作ってみましょう。
練習1: プレイヤー参加メッセージ
プロンプト:
Create a script that prints a welcome message to the Output when a player joins the game. The message should include the player’s name. Save it to ServerScriptService/GameLogic/ as WelcomeMessage.lua following CLAUDE.md rules.
Claude Codeが行うこと:
- コードを生成
- ローカルファイルに保存(Cursor側)
- Roblox Studioに保存(Studio側)
- 完了を報告
応答例:
I’ve created WelcomeMessage.lua with the following functionality:
– Listens for Players.PlayerAdded event
– Prints “Welcome to the game, [PlayerName]!” to Output
– Saved to both:
– Local: ./src/ServerScriptService/GameLogic/WelcomeMessage.lua
– Roblox Studio: ServerScriptService.GameLogic.WelcomeMessage
The script is ready to test!
確認:
Cursorの左側でファイルが作成されているか確認。
Roblox Studioでテストプレイ:
- Playボタンをクリック
- Outputウィンドウを確認
Welcome to the game, Player1!のようなメッセージが表示されればOK
練習2: パーツの色を変える
プロンプト:
Create a script that changes the color of all parts in the Workspace to bright red when the game starts. Save it to ServerScriptService/GameLogic/ as ColorChanger.lua following CLAUDE.md rules.
テスト前の準備:
Roblox Studioで、Workspace内にいくつかパーツを追加しておきましょう:
- 上部メニュー → Home タブ
- 「Part」ボタンをクリック(何度か押して3〜4個追加)
- Workspaceに複数のパーツができます
テスト:
Playボタンをクリック → すべてのパーツが赤色に変わればOK!
練習3: キーボード入力でジャンプ
プロンプト:
Create a LocalScript that makes the player jump when they press the Space key. Save it to StarterPlayer/StarterPlayerScripts/ as SpaceJump.lua following CLAUDE.md rules.
ポイント:
- LocalScript(クライアント側)を明示
- StarterPlayerScripts に保存(プレイヤーごとに実行される)
テスト:
Playボタン → スペースキーを押してジャンプできればOK!
Claude Codeとの「会話」
Claude Codeの強みは、会話しながら改善できることです。
例:段階的に改善する
最初の指示:
Create a script that spawns a red part above the player’s head when they join.
Claude Codeがスクリプトを作成。
テストしてみたら、パーツが大きすぎた!
次の指示:
Make the part smaller, about 1x1x1 in size.
Claude Codeが自動的に前のスクリプトを修正。
今度は色を変えたい:
Change the color to bright blue instead of red.
また修正してくれます。
さらに、回転させたい:
Make the part rotate slowly above the player’s head.
回転のコードが追加されます。
このように、会話しながら少しずつ改善していけます。
説明を求める
Claude Codeが生成したコードが理解できないときは、説明を求めましょう:
Explain how the rotation code works in simple terms.
Claude Codeが初心者向けに説明してくれます:
The rotation code works like this:
1. We use RunService.Heartbeat – this runs every frame (60 times per second)
2. Each frame, we increase the rotation angle by a small amount
3. CFrame.Angles() converts the angle to a rotation
4. We apply this rotation to the part
Think of it like a spinning top – we give it a tiny push every fraction of a second, making it appear to spin smoothly.
よくある失敗と対処法
失敗1: スクリプトが動かない
症状:
- テストプレイしても何も起こらない
- Outputにエラーも表示されない
原因:
- スクリプトが正しい場所にない
- スクリプトタイプが間違っている(ScriptとLocalScriptの違い)
対処:
Claude Codeに確認を依頼:
Check if all scripts are in the correct locations and have the correct script types according to CLAUDE.md.
Claude Codeが確認して、問題があれば修正してくれます。
失敗2: エラーが出る
症状:
- Outputに赤いエラーメッセージが表示される
対処:
エラーメッセージをコピーして、Claude Codeに貼り付け:
I’m getting this error: [エラーメッセージを貼り付け]
Please fix it.
Claude Codeがエラーを解析して、修正版を提供してくれます。
失敗3: 指示が曖昧で望んだものが作られない
症状:
- 作られたスクリプトが意図と違う
対処:
より具体的に指示し直す:
/undo (前の変更を取り消す)
Let me be more specific: [より詳しい説明]
例:
/undo
Let me be more specific: Create a part that:
– Size: 5x1x5
– Position: (0, 0.5, 0)
– Color: Bright green
– Material: Grass
– Anchored: true
Cursorでの微調整
Claude Codeで基本を作り、Cursorで細かい数値を調整するのが効率的です。
例:ジャンプ力の微調整
Claude Codeで生成したスクリプト:
local Players = game:GetService(“Players”)
Players.PlayerAdded:Connect(function(player)
player.CharacterAdded:Connect(function(character)
local humanoid = character:WaitForChild(“Humanoid”)
humanoid.JumpPower = 100 — ジャンプ力を設定
end)
end)
Cursorで調整:
- Cursorで
JumpBoost.luaを開く JumpPower = 100の100を80に変更- Ctrl + S で保存
- Roblox Studioでスクリプトを開いて、Ctrl + V で貼り付け
- テストプレイして確認
ちょうど良い数値になるまで、この繰り返し。
80 → まだ高い → 60 → ちょうどいい!
これがデュアルセーブの真価です。
Pro Tips: Claude Codeをもっと便利に
Tip 1: ファイルをドラッグ&ドロップ
CursorのファイルをShiftキーを押しながらドラッグして、ターミナル(Claude Code)にドロップすると、そのファイルのパスが自動入力されます。
Modify this file: [ドロップしたファイルパス] to add a countdown timer.
Tip 2: 複数ファイルの一括編集
Update all scripts in ServerScriptService/GameLogic/ to include a header comment with the file name and creation date.
Claude Codeが複数ファイルを一度に編集してくれます。
Tip 3: コードレビューを依頼
Review the code in WelcomeMessage.lua and suggest improvements for performance and readability.
Claude Codeが改善案を提示してくれます。
Tip 4: プロジェクト全体を説明してもらう
Explain the overall structure of this project and what each script does.
プロジェクト全体の概要を把握できます。
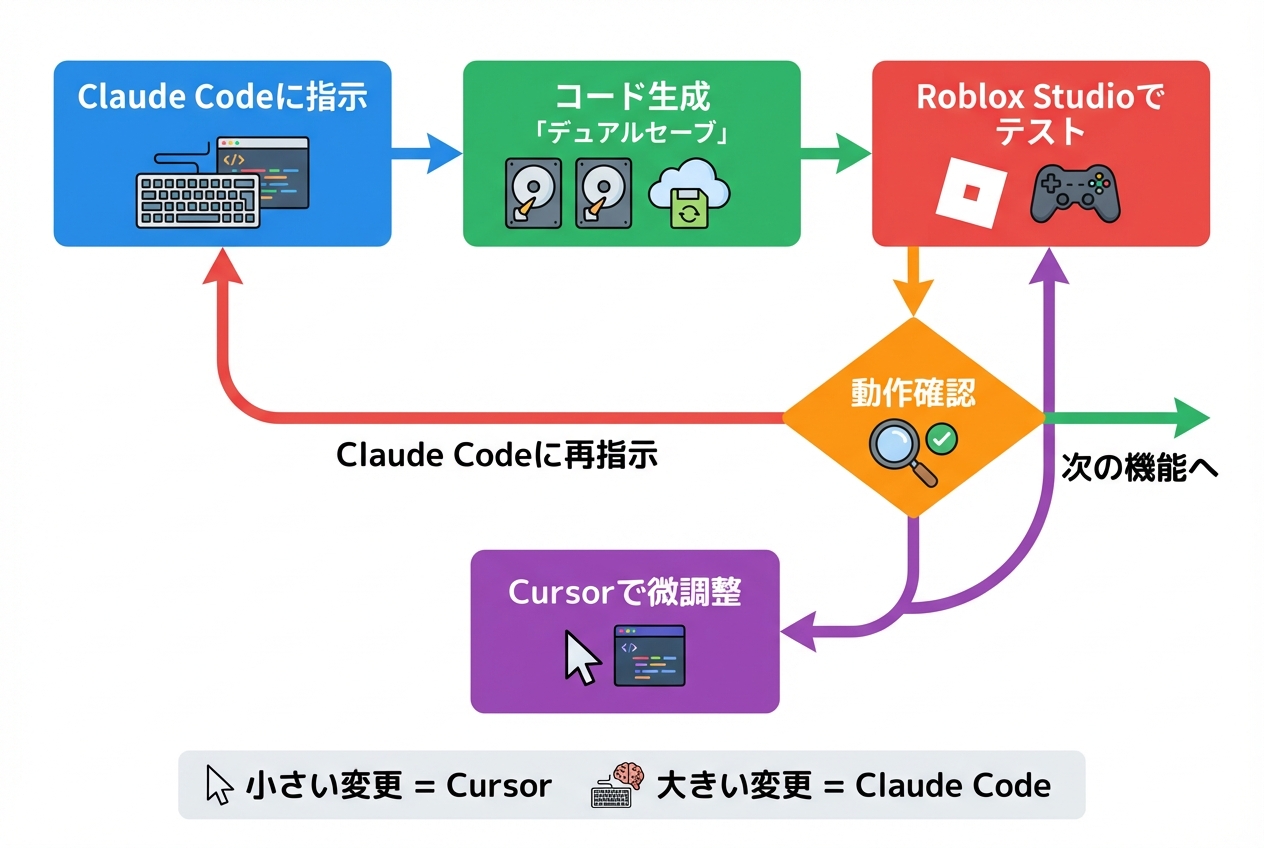
開発フローのまとめ
効率的な開発フローはこうです:
1. Claude Codeに大まかな指示
↓
2. コード生成(デュアルセーブ)
↓
3. Roblox Studioでテストプレイ
↓
4. 動作確認
↓
問題なし → 次の機能へ
↓
調整が必要 → Cursorで微調整 → 3に戻る
↓
大きな変更が必要 → Claude Codeに再指示 → 2に戻る
小さい変更 = Cursor 大きい変更 = Claude Code
この使い分けが重要です。
練習問題
以下のスクリプトをClaude Codeで作ってみましょう:
問題1: テレポートパッド
プレイヤーが踏むと別の場所にテレポートするパッドを作成してください。
ヒント:
- パッドのパーツを作成
- Touched イベントを使用
- プレイヤーのCFrame(位置)を変更
問題2: スコアシステム
プレイヤーのスコアを管理するシステムを作成してください。
ヒント:
- Leaderboard(リーダーボード)を使用
- プレイヤー参加時にスコアを初期化
- スコアを増やす関数を作成
問題3: デイ/ナイトサイクル
時間経過で昼と夜が切り替わるシステムを作成してください。
ヒント:
- Lighting サービスを使用
- ClockTime プロパティを変更
- ループで時間を進める
プロンプトの例は付録に掲載します。まずは自分で考えてみましょう!
まとめ
この章で学んだこと:
- ✅ Claude Codeの基本コマンド(/clear, /undo, /context など) ✅ 効果的なプロンプトの書き方 ✅ 会話しながら段階的に改善する方法 ✅ Cursorでの微調整テクニック ✅ よくある失敗と対処法
次回の実践編では、いよいよ実際のゲーム(オビー)を最初から最後まで作ります!
ここまでの練習で、Claude Codeとの「会話」に慣れてきたと思います。次は実践です!